So, today we will examine chords and progressions for the Christmas carol "Oh Holy night". Keep in mind that this lesson is not aimed at the beginner since two hand chords are being used and a bass player covers the bass notes. Also note that due the breakdown being so long because of all the nice chords, I had to break it into two parts. This will be part 1
So first have a look at the video clip for an example of how to play the song and of what we will be covering in this lesson.
So let's examine the number system and scale of the key of A:

A-B-C#-D-E-F#-G#-A
1-2-3-4-5-6-7-1
The song is also broken down into smaller parts to make it easier to practice. Learn one part at a time and at the end, join them all together.
Part 1
The first part covers "Oh holy night, the stars are brightly shining". The progression goes from 1-1-4-5. The first chord is over an A-Bass which is over the 1-chord and it covers "Oh". It can be played as follows:


This is a G-diminished 7 chord
Please note that the above two notes with the chord all happens over the 1-chord which is A-Bass. The next chord is over a D-Bass which is over the 4 chord. This covers "the stars are". Before you play the 4 chord, you can add a melody note "E" and then play the chord.

Then you can move to the 5 chord, which is over an E-Bass to cover "Brightly". The chord can be played like this:

Then you move back to the 1-chord which is over an A-Bass to cover "Shining". The chord can be played like this:

Right after you played the 1 chord, you can do an "in between" movement with both hands. Let me try and explain the move the best as I can.
You will keep on sustaining both A notes with your left hand pinkie and your right hand pinkie, then with both hands simultaneously, try and play the following notes in each hand as indicated:

Please remember that this is
single notes at a time and not all at once.
This concludes part 1! Try now and play part 1 as an entire piece and listen to see if you can hear the melody as you play the chords for "Oh holy night, the stars are brightly shining".
Part 2
The next part looks at "It is the night of our dear Saviour's birth". The chords progress from 3-6-2-5-1. The first chord is on the 3-chord which is a C#-Bass. This is used as a passing chord to get to 6. This covers "It is" as follows:

Before playing the above chord, play a melody note C#
Next you move to the 6 chord which is over a F#-Bass. It looks like this:

You can also play a G# melody note before playing the 6 chord
The above chord covered "the night". Next we will have to play "of our dear". This gets covered by first playing the melody C# D and then going to a 2 chord which is over a B-Bass and it looks like this:

The next chord covers "Saviour's". This can be accomplished by going to the 5 chord which is over an E-Bass, playing the following chord:

After playing this chord, you can add a B melody note
Then the last chord in part 2 goes back to the 1 chord to cover "birth". The last chord can be played like this:

Great! We've completed part 2! Remember to review part two and see if makes sense before you continue onto the next part. But wait...there's more! Before you go to part 3, let me give you two more passing chords that will get you to the 1 or A-Bass of part 3. It's a 6b-7b-1 progression. Meaning the bass plays F-G-A.
The first chord over F looks like this:

Then you play two right hand chords before playing the next chord over G. The first RH chord is (apologies for the two RH chord snapshots. The left hand chord should not be played while the two chords are being played):


This all happens while sitting on that F bass before going to G. Otherwise it's not going to sound right. Then the last chord is G before going to A, which is your 1. This is over the 7b:

Awesome! This is a nice movement you can use in a lot of different songs. Now once you've practiced part 2, get ready to go to part 3!
Part 3
In this part, the chord progression is very similar to part 1 since the melody is the same for "Long lay the world, in sin and error pining". The only difference this time is that you can move the melody up an octave higher and play left hand chords making it sound much fuller. So the progression is still, 1-1-4-5-1. Let's look at the first chord:

Go back to part 1 and check if you can see the difference between playing a left hand chord and without. Most of the time the left hand chord is a copy of a right hand chord, but sometimes you can exclude some of the notes. This is how I discovered left hand chords.Other times, someone will just have to show you a two hand chord, where there is no sign of a duplication of the chord you're playing.
Anyways...let's continue. The next chord still remains over the 1 chord which is an A-Bass. It covers "the world", and can be played like this:

Another example of duplicating the same chord
Now you move to the 4 chord which is over a D-Bass. This is to cover "in sin" and looks like this:

This is an example where you played a Dmaj7th
in your left hand and just a Dmaj in you right hand.
The next chord is played on a 5 chord which is over an E-Bass. This is to cover "and error". Play it like this:

Then you can go back to the 1 chord which is over an A-Bass, to cover "pining". The chord can be played like this:

If you want, you can invert the right hand chord down to E-A-C# to finish the melody. This concludes this section. Remember to practice this piece by itself before moving on....
Part 4
The last part for this week's lesson goes from the 7-3-7-3-6 (G#-C#-G#-C#-F#) to cover "till he appeared, and the soul felt its worth". I know it might sound a bit confusing, but it moves from one key to another and then back to the original key so therefore the 7 and 3 actually represents other numbers in the key of E, making the chords different for those numbers while in the key of E.
So the first chord is over the 7, which is a G#-Bass. The chord is like this:
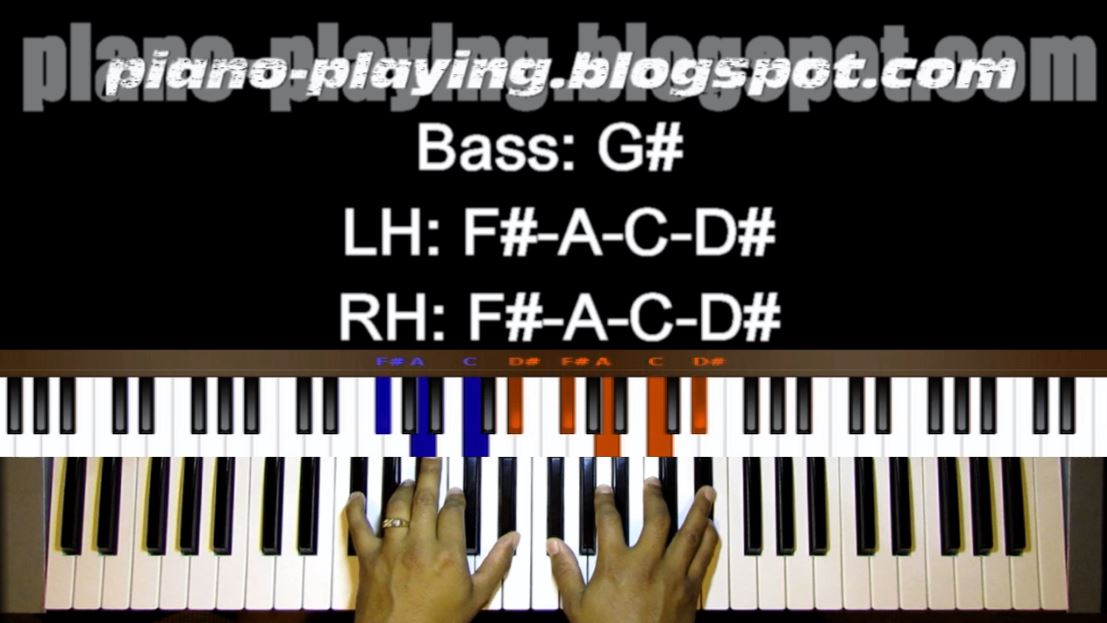
Before you play the chord, you can add an E melody note. It
is at this stage where you are in the key of E, so technically the G# is the
3 chord of E, but to avoid confusion, we keep it as a 7
Then you go to the 3 chord to cover "appeared" which is a C#-Bass. The chord to play is this:

As can be seen, we are still in the key of E, as the above chord
is technically the 6 of E over a C#-Bass
The next part returns back to the 7 chord over a G#-Bass, which will cover "and the soul". First start off by playing two melody notes E F# then play the next chord:

Now to go to "felt it's worth". This will be covered by going back to the 3, which is a C#-Bass, as a passing chord:

And the last chord for this melody goes to the 6 chord which is over a F#-Bass. The chord looks like this:

The very last chord is just a passing chord on the 2, which is a B-Bass. This will set you up to go to the 5 chord, for the next section we will examine next week. So the 2 chord has a little chromatic that you can add before you play the actual chord. It start off on the right hand:

Once you get to the 3rd chord, you can play this next chord over the 2:

The right hand chord forms part of the same chromatic pattern, which is actually the 4th right hand chord, but it forms part of the last chord.
That's it! This ends the first part of this lesson. I strongly recommend you practice the parts individually and then combine them together. If there are things that are unclear, feel free to ask questions and I would also recommend watching the video example.
Thanks for going through this lesson with me, and please share, like this lesson. Also subscribe to my email on the top right hand side of this blog or find all my video lessons on my Youtube channel.
No comments:
Post a Comment
Thank you for taking the time to comment! Your email address will not be published, but you will receive a notification when your comment has a reply. All comments are moderated so it may take some time to get back to you.